
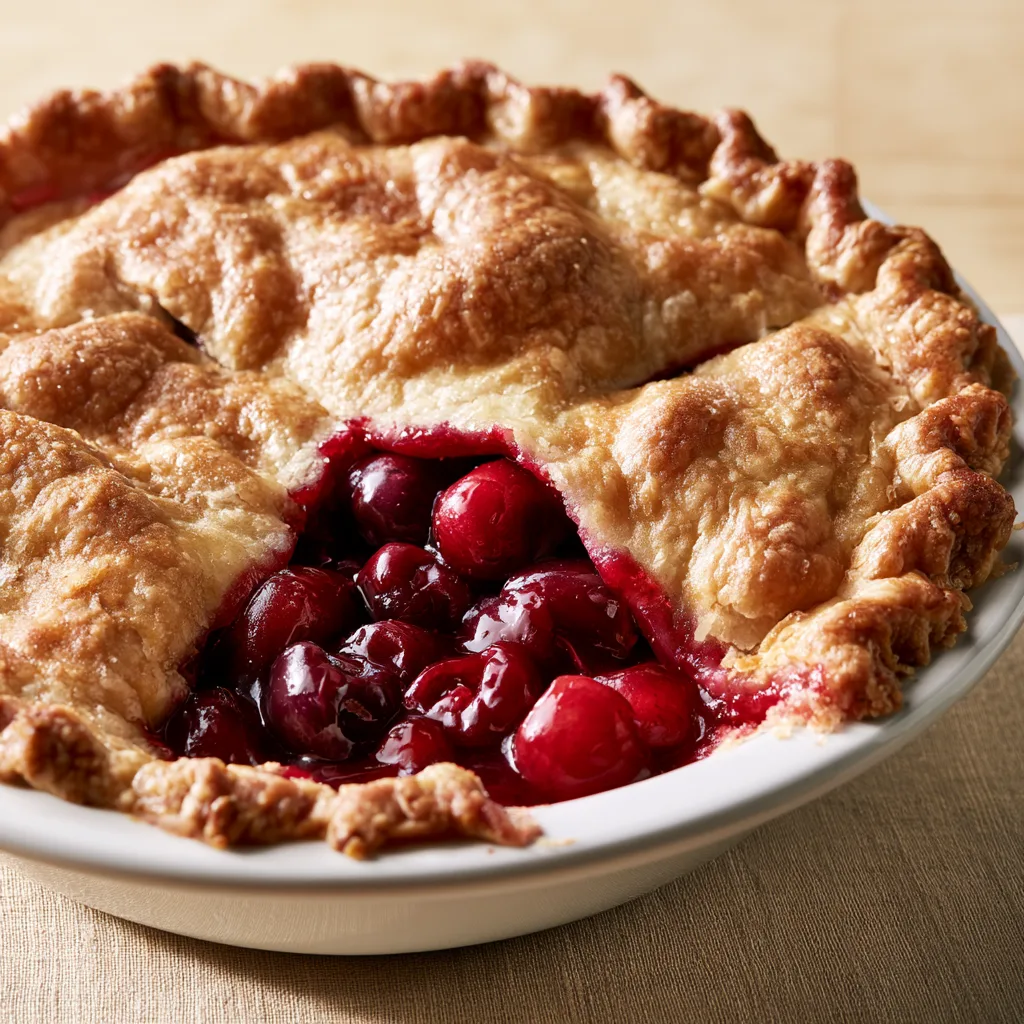
Introduction to Indulge in Classic Cherry Delight: A Sweet Taste of Home!
There’s something magical about a homemade dessert that brings back memories of family gatherings and warm summer days. When I think of comfort food, I can’t help but indulge in Classic Cherry Delight: A Sweet Taste of Home! This delightful treat is not just a dessert; it’s a hug in pie form. Perfect for busy moms and professionals, it’s a quick solution for those hectic days when you want to impress your loved ones without spending hours in the kitchen. Trust me, this cherry delight will have everyone asking for seconds!
Why You’ll Love This Indulge in Classic Cherry Delight
This Classic Cherry Delight is a dream come true for busy cooks like us! It’s incredibly easy to whip up, taking just 15 minutes of prep time. The sweet, tangy cherry filling paired with a buttery crust creates a flavor explosion that will make your taste buds dance. Plus, it’s a versatile dessert that can be enjoyed warm or cold, making it perfect for any occasion. Who wouldn’t love that?
Ingredients for Indulge in Classic Cherry Delight
Gathering the right ingredients is the first step to creating this delightful dessert. Here’s what you’ll need:
- Fresh cherries: The star of the show! Sweet, juicy cherries bring a burst of flavor. If fresh cherries aren’t available, frozen ones work just as well.
- Granulated sugar: This sweetener balances the tartness of the cherries, making every bite a treat.
- Cornstarch: A thickening agent that helps create a luscious filling. It ensures your cherry delight isn’t too runny.
- Lemon juice: A splash of acidity brightens the flavors and enhances the cherries’ natural sweetness.
- Vanilla extract: This adds a warm, comforting aroma and depth to the filling, making it even more irresistible.
- Pre-made pie crust: A time-saver! Using a store-bought crust means you can focus on the delicious filling. If you’re feeling adventurous, homemade crust is always an option.
- Butter: A few small pieces dot the filling, adding richness and a lovely golden finish to the crust.
For exact measurements, check the bottom of the article where you can find everything listed for easy printing. Happy baking!
How to Make Indulge in Classic Cherry Delight
Step 1: Preheat the Oven
First things first, let’s get that oven preheating to 375°F (190°C). Preheating is crucial because it ensures your pie bakes evenly. A hot oven helps the crust become golden and flaky while the filling bubbles beautifully. Trust me, you don’t want to skip this step!
Step 2: Prepare the Cherry Filling
Now, let’s dive into the cherry filling! In a mixing bowl, combine your fresh cherries, granulated sugar, cornstarch, lemon juice, and vanilla extract. Gently stir everything together until the cherries are well-coated. The sugar will draw out the juices, and the cornstarch will thicken it all up. This mixture is the heart of your Classic Cherry Delight!
Step 3: Assemble the Pie
Grab your pre-made pie crust and place it in a pie dish. Pour the cherry mixture into the crust, spreading it evenly. Don’t forget to dot the top with small pieces of butter. This little touch adds richness and helps the crust achieve that perfect golden color. It’s like giving your pie a warm hug!
Step 4: Bake the Pie
Time to bake! Place your pie in the preheated oven and let it bake for 30-35 minutes. Keep an eye on it; you want the filling to be bubbly and the crust to turn a lovely golden brown. If the edges of the crust start to brown too quickly, cover them with foil to prevent burning. Your kitchen will smell heavenly!
Step 5: Cool and Serve
Once baked, remove the pie from the oven and let it cool for at least 15 minutes. Cooling is essential because it allows the filling to set up a bit. Serve your Classic Cherry Delight warm or at room temperature, and don’t forget a scoop of vanilla ice cream or a dollop of whipped cream on top. It’s the cherry on the cake, quite literally!
Tips for Success
- Use ripe, sweet cherries for the best flavor. They make all the difference!
- Don’t skip the cooling time; it helps the filling set and makes slicing easier.
- For a twist, try adding a pinch of cinnamon to the cherry mixture.
- Keep an eye on the crust; if it browns too fast, cover it with foil.
- Serve with a scoop of ice cream for an extra indulgent treat!
Equipment Needed
- Pie dish: A standard 9-inch pie dish works perfectly. If you don’t have one, a round baking dish will do.
- Mixing bowl: Any large bowl will suffice for mixing your cherry filling.
- Measuring cups and spoons: Essential for accurate ingredient measurements. You can use a kitchen scale if you prefer.
- Spatula: Great for mixing and spreading the cherry filling evenly.
Variations of Indulge in Classic Cherry Delight
- Berry Medley: Swap out some cherries for blueberries or raspberries for a mixed berry delight. The combination adds a burst of color and flavor!
- Almond Extract: Replace vanilla extract with almond extract for a nutty twist that complements the cherries beautifully.
- Gluten-Free Option: Use a gluten-free pie crust to make this dessert suitable for those with gluten sensitivities.
- Vegan Version: Substitute butter with coconut oil and use a vegan pie crust for a plant-based treat everyone can enjoy.
- Chocolate Drizzle: After baking, drizzle melted chocolate over the cooled pie for an indulgent touch that chocolate lovers will adore!
Serving Suggestions for Indulge in Classic Cherry Delight
- Pair with a scoop of vanilla ice cream for a classic combination that never disappoints.
- Serve alongside a dollop of freshly whipped cream for added richness.
- Drizzle with a bit of chocolate sauce for a decadent touch.
- Accompany with a cup of hot coffee or tea to balance the sweetness.
- Garnish with fresh mint leaves for a pop of color and freshness.
FAQs about Indulge in Classic Cherry Delight
Can I use frozen cherries for this recipe?
Absolutely! Frozen cherries work just as well as fresh ones. Just make sure to thaw and drain any excess liquid before mixing them with the other ingredients. This way, your filling won’t be too watery.
How do I store leftovers of Classic Cherry Delight?
Store any leftovers in the refrigerator for up to three days. Just cover the pie with plastic wrap or aluminum foil to keep it fresh. You can enjoy it cold or reheat it in the oven for a warm treat!
Can I make this pie ahead of time?
Yes! You can prepare the cherry filling a day in advance and store it in the fridge. Just assemble and bake the pie when you’re ready to serve. It’s a great way to save time on busy days!
What can I serve with Classic Cherry Delight?
This pie pairs wonderfully with whipped cream or vanilla ice cream. You can also serve it with a drizzle of chocolate sauce for an extra indulgent touch. It’s a dessert that’s sure to impress!
Is this recipe suitable for a gluten-free diet?
Yes! Simply use a gluten-free pie crust, and you’ll have a delicious dessert that everyone can enjoy. It’s a great way to include friends and family with dietary restrictions in the fun!
Final Thoughts
Indulging in Classic Cherry Delight is more than just enjoying a slice of pie; it’s about creating memories and sharing joy with loved ones. The sweet aroma wafting through your kitchen as it bakes is a reminder of simpler times and cherished moments. This recipe is a delightful way to bring a taste of home to your table, no matter how busy life gets. So, gather your family, slice up that pie, and let the laughter and stories flow. Trust me, every bite will be a sweet reminder of love and togetherness!
Print
Indulge in Classic Cherry Delight for a Sweet Treat!
- Total Time: 50 minutes
- Yield: 8 servings 1x
- Diet: Vegetarian
Description
A delightful dessert featuring a rich cherry filling and a buttery crust, perfect for any occasion.
Ingredients
- 2 cups fresh cherries, pitted
- 1 cup granulated sugar
- 2 tablespoons cornstarch
- 1 tablespoon lemon juice
- 1 teaspoon vanilla extract
- 1 pre-made pie crust
- 1 tablespoon butter, cut into small pieces
Instructions
- Preheat the oven to 375°F (190°C).
- In a mixing bowl, combine the cherries, sugar, cornstarch, lemon juice, and vanilla extract.
- Pour the cherry mixture into the pie crust and dot with butter.
- Bake in the preheated oven for 30-35 minutes, or until the filling is bubbly and the crust is golden brown.
- Allow to cool before serving.
Notes
- Serve with whipped cream or vanilla ice cream for added indulgence.
- Can be made with frozen cherries if fresh are not available.
- Store leftovers in the refrigerator for up to 3 days.
- Prep Time: 15 minutes
- Cook Time: 35 minutes
- Category: Dessert
- Method: Baking
- Cuisine: American
Nutrition
- Serving Size: 1 slice
- Calories: 250
- Sugar: 20g
- Sodium: 150mg
- Fat: 10g
- Saturated Fat: 5g
- Unsaturated Fat: 3g
- Trans Fat: 0g
- Carbohydrates: 35g
- Fiber: 2g
- Protein: 2g
- Cholesterol: 15mg