
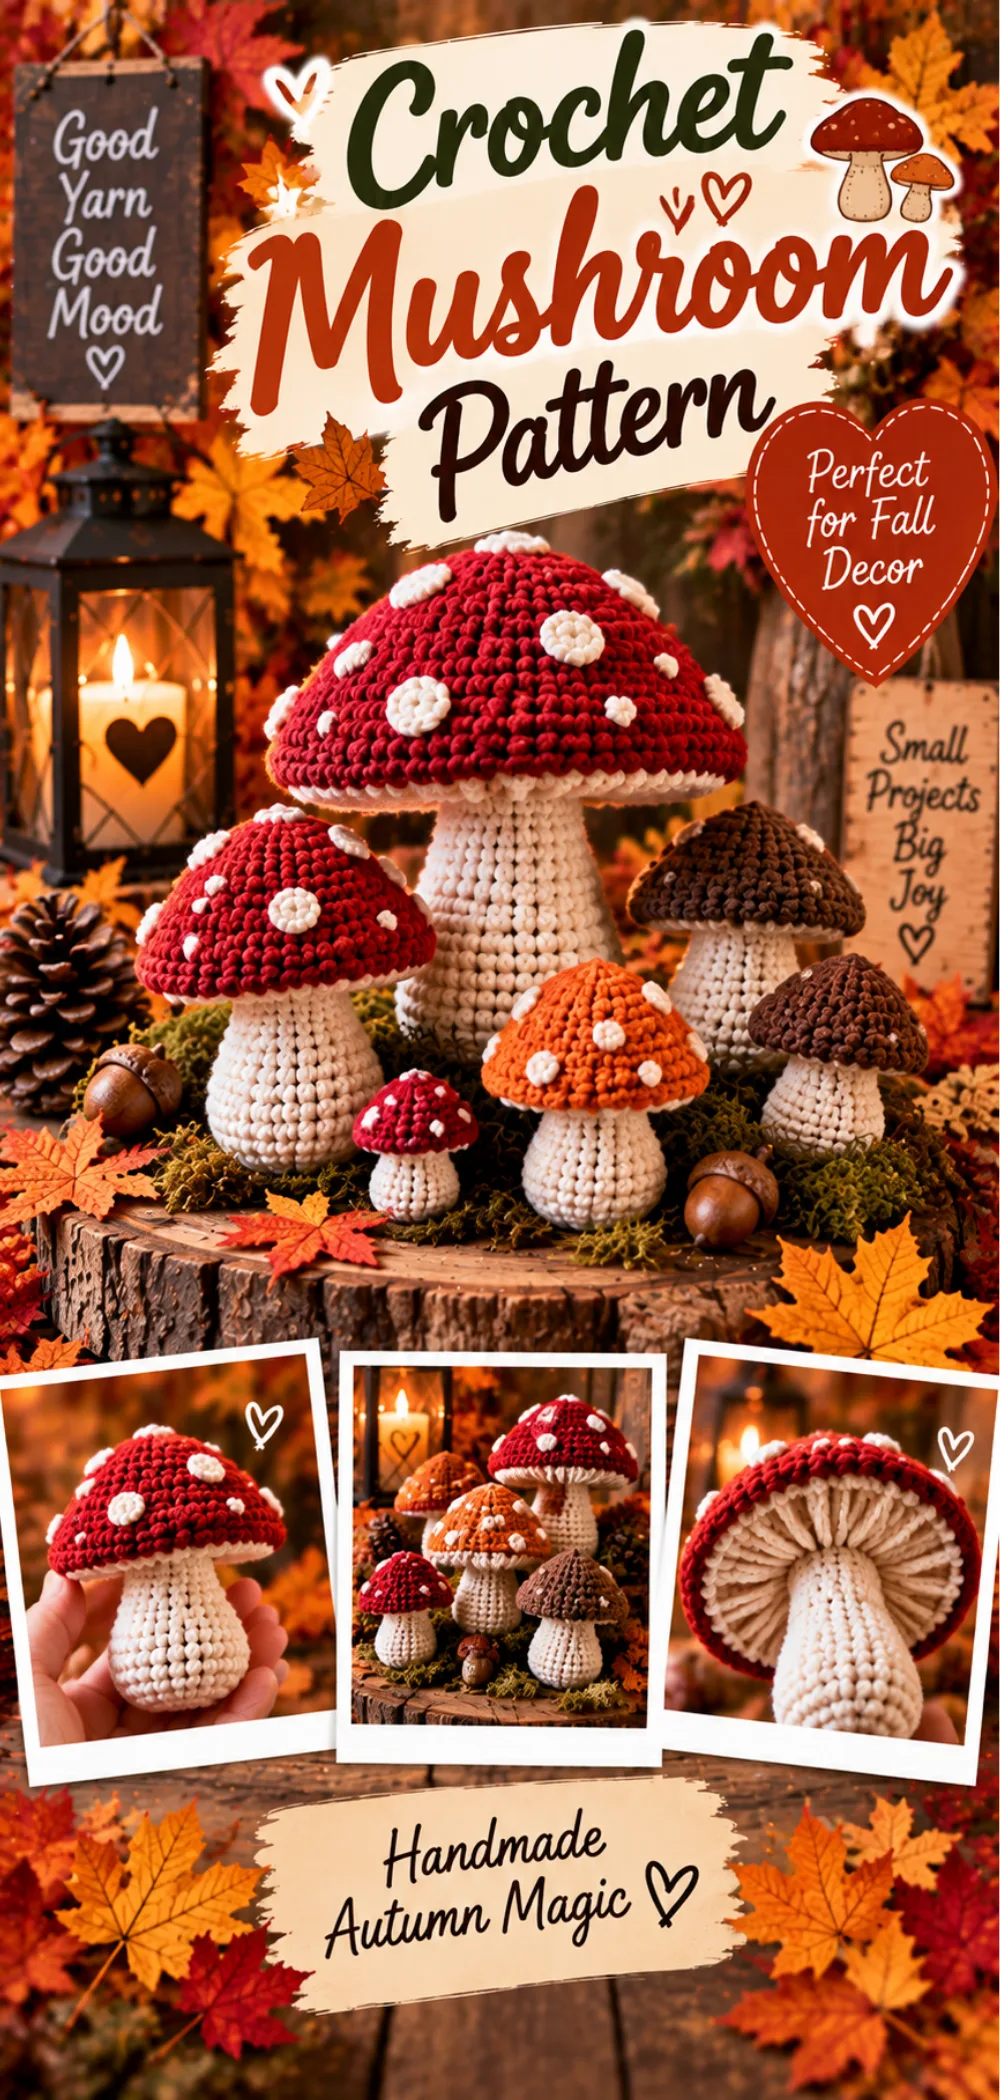
Step-by-Step Instructions for the Crochet Mushroom Pattern That’s Perfect for Fall
Follow these detailed instructions to create your own adorable crochet mushrooms. Each step is broken down clearly to ensure a smooth crafting experience.
Round 1: Start with a magic ring and crochet 6 single crochets (sc) into the ring. (6 stitches)
Round 2: Increase in each stitch around. To do this, crochet 2 single crochets in each stitch from the previous round. (12 stitches)
Round 3: Continue to increase by crocheting 1 single crochet in the first stitch, then 2 single crochets in the next stitch. Repeat this pattern around. (18 stitches)
Round 4: Crochet 1 single crochet in the first two stitches, then 2 single crochets in the next stitch. Repeat this pattern around. (24 stitches)
Continue to increase until you reach the desired size for the mushroom cap. You can adjust the number of rounds based on how large you want your mushroom cap to be.
Switching to the Stem: Once the cap is complete, switch to white yarn. For the stem, crochet 1 single crochet in each stitch around for the next 5 rounds. This will create a sturdy stem.
Attaching the Cap: After finishing the stem, securely attach the cap to the top of the stem. Make sure to align the stitches properly for a neat finish.
Adding Details: Use a contrasting color to add spots on the cap. You can do this by crocheting small circles or using a surface slip stitch technique to create the spots.
Stuffing (Optional): If you want a plush effect, stuff the mushroom lightly before closing the top. Use a yarn needle to weave in any loose ends after finishing your mushroom.
Congratulations! You’ve completed your crochet mushroom. Enjoy displaying it as part of your fall decorations!
Introduction / About This Crochet Mushroom Pattern That’s Perfect for Fall
Welcome to the delightful world of crochet! This crochet mushroom pattern is a whimsical project that brings the charm of fall right into your home. With its vibrant colors and playful design, these mushrooms make perfect decorations for the season.
This pattern is designed to be accessible for both beginners and intermediate crocheters. Whether you’re just starting your crochet journey or looking to refine your skills, you’ll find this project enjoyable and rewarding.
The construction of the mushroom is straightforward, beginning with a magic ring to form the cap, followed by a sturdy stem. The combination of the charming cap and the solid stem creates an adorable finished piece that you’ll love to display. Plus, the opportunity to customize colors and sizes adds a personal touch to your creations, making each mushroom unique.
IMAGE: A beautifully arranged display of finished crochet mushrooms in various sizes and colors, set against a rustic wooden background with autumn leaves scattered around.
ALT: Crochet Mushroom Pattern That’s Perfect for Fall – finished mushrooms in red, white, and brown on a wooden table with autumn leaves.
Crochet Pattern Quick Overview
| Detail | Information |
| Skill Level | Beginner to Intermediate |
| Crochet Terminology | US Terms |
| Yarn Weight | Worsted Weight |
| Crochet Hook Size | G/4.0mm |
| Approximate Finished Size | 4-6 inches tall (varies by tension) |
| Approximate Working Time | 40 minutes |
| Construction Method | Worked in rounds |
| Crochet Technique | Amigurumi |
About This Crochet Mushroom Pattern That’s Perfect for Fall
This crochet mushroom pattern is constructed in rounds, beginning with a magic ring to form the cap. This technique creates a tight and secure starting point, ensuring that your mushroom cap has a lovely rounded shape. As you work in rounds, you will increase stitches to create the desired size for the cap, allowing for a smooth transition into the stem.
Once the cap is complete, you will switch to white yarn to crochet the stem. This straightforward approach not only makes the project easy to follow but also provides a wonderful opportunity for creativity. You can customize your mushrooms with different colors, sizes, and embellishments, making each piece unique and personal.
Throughout this pattern, you will practice essential crochet skills such as increasing stitches to shape the cap and securely attaching the cap to the stem. These techniques are fundamental in amigurumi and will enhance your overall crochet abilities. Enjoy the process of creating these charming mushrooms, and let your imagination run wild with color combinations and designs!
Materials and Supplies
To create your crochet mushrooms, you will need a few essential materials. Each item plays a crucial role in ensuring your project turns out beautifully, especially when it comes to achieving that perfect fall aesthetic.
- Yarn in red, white, and brown: These colors are ideal for capturing the essence of fall. The red can represent the vibrant caps of mushrooms, while white and brown can be used for the stem and details. Choose a worsted weight yarn for the best results, as it provides the right amount of structure and softness.
- Crochet hook (size G/4.0mm): This size is perfect for working with worsted weight yarn, allowing for a comfortable tension that makes your stitches look neat and even.
- Scissors: A good pair of scissors is essential for cutting yarn cleanly and neatly.
- Tapestry needle: This tool is necessary for weaving in loose ends and attaching different parts of your mushroom together.
- Stuffing (optional): If you prefer a plush effect for your mushrooms, stuffing will help achieve that rounded look.
IMAGE: A neatly arranged collection of yarn in red, white, and brown, along with a crochet hook, scissors, and a tapestry needle.
ALT: Materials for Crochet Mushroom Pattern That’s Perfect for Fall – yarn, crochet hook, and tools arranged on a table.
Best Yarn for Crochet Mushroom Pattern That’s Perfect for Fall
For this crochet mushroom pattern, I recommend using worsted weight yarns such as Red Heart Super Saver or Bernat Super Value. These brands offer a wide range of colors, including vibrant reds and soft whites, perfect for your mushrooms. Acrylic yarn is a great choice for its durability and ease of care, making it suitable for decorations that may be handled frequently. Alternatively, cotton yarn can provide a lovely texture and is also easy to wash, which is beneficial if you plan to use your mushrooms as gifts or for display.
Suitable Yarn Substitutions
If you don’t have access to the recommended yarns, you can substitute with any worsted weight yarn that you prefer. Just be sure to check the gauge and yardage to ensure you have enough yarn for your project. When selecting a substitute, look for yarns that maintain a similar structure and appearance to the original, as this will help your mushrooms hold their shape. Avoid overly stretchy or fuzzy yarns, as they may not provide the desired finish.
Crochet Hook and Additional Tools
As mentioned, you will need a size G/4.0mm crochet hook for this project. This size is ideal for working with worsted weight yarn, allowing for a comfortable grip and even tension. In addition to the hook, you will need scissors for cutting your yarn and a tapestry needle for weaving in ends and assembling your mushrooms. Optional items include stuffing for a plush effect and safety eyes if you want to add a cute face to your mushrooms, giving them even more character.
Crochet Stitches and Techniques Used
In this crochet mushroom pattern, you will primarily use two basic stitches: single crochet and the magic ring. Familiarity with these stitches is essential for successfully completing your mushrooms. If you need a refresher on any of these techniques, I recommend checking out the linked tutorials for detailed guidance.
Single Crochet
Single crochet (sc) is the foundation of this pattern, used extensively in both the cap and the stem of the mushroom. This stitch creates a tight and sturdy fabric, which is perfect for amigurumi projects like this one. To work a single crochet, insert your hook into the stitch, yarn over, pull up a loop, yarn over again, and pull through both loops on your hook. This simple yet effective stitch will help shape your mushroom beautifully.
IMAGE: A close-up of the single crochet stitch, showing the stitch structure and insertion point clearly.
ALT: Single crochet stitch used in the Crochet Mushroom Pattern That’s Perfect for Fall.
Magic Ring
The magic ring is a crucial technique for starting the mushroom cap. It allows you to create a tight center that prevents gaps, ensuring a neat finish. To make a magic ring, wrap the yarn around your fingers to form a loop, insert your hook into the loop, yarn over, and pull up a loop. Then, crochet your stitches into the ring as instructed in the pattern. This method is especially useful for projects worked in the round, as it provides a solid base for your work.
Crochet Abbreviations
| Abbreviation | Meaning |
|---|---|
| ch | chain |
| sc | single crochet |
| inc | increase |
| st | stitch |
| sl st | slip stitch |
| rnd | round |
Gauge
Gauge is an essential aspect of crocheting, especially for projects like this crochet mushroom pattern. Achieving the correct gauge ensures that your finished mushrooms are the desired size and shape. If your gauge is off, your mushrooms may turn out larger or smaller than intended, which can affect their overall appearance and how they fit together.
For this pattern, it is recommended to check your gauge before starting. To do this, crochet a small swatch using the same yarn and hook you plan to use for the mushrooms. Aim for a gauge of:
Gauge Sample:
- 4 single crochets (sc) = 1 inch
- 4 rows = 1 inch
Step-by-Step Instructions for the Crochet Mushroom Pattern That’s Perfect for Fall
Follow these detailed instructions to create your own adorable crochet mushrooms. Each step is broken down clearly to ensure a smooth crafting experience.
Round 1: Start with a magic ring and crochet 6 single crochets (sc) into the ring. (6 stitches)
Tip: Make sure the magic ring is tight to avoid gaps in the center of your mushroom cap.
Round 2: Increase in each stitch around. To do this, crochet 2 single crochets in each stitch from the previous round. (12 stitches)
Tip: Keep your tension consistent to ensure even stitches. If you find your stitches are too tight, relax your grip on the yarn.
Round 3: Continue to increase by crocheting 1 single crochet in the first stitch, then 2 single crochets in the next stitch. Repeat this pattern around. (18 stitches)
Round 4: Crochet 1 single crochet in the first two stitches, then 2 single crochets in the next stitch. Repeat this pattern around. (24 stitches)
Continue to increase until you reach the desired size for the mushroom cap. You can adjust the number of rounds based on how large you want your mushroom cap to be.
Switching to the Stem: Once the cap is complete, switch to white yarn. For the stem, crochet 1 single crochet in each stitch around for the next 5 rounds. This will create a sturdy stem.
Tip: Ensure that the transition from the cap to the stem is smooth by aligning the stitches properly.
Attaching the Cap: After finishing the stem, securely attach the cap to the top of the stem. Make sure to align the stitches properly for a neat finish.
Adding Details: Use a contrasting color to add spots on the cap. You can do this by crocheting small circles or using a surface slip stitch technique to create the spots.
Stuffing (Optional): If you want a plush effect, stuff the mushroom lightly before closing the top. Use a yarn needle to weave in any loose ends after finishing your mushroom.
Congratulations! You’ve completed your crochet mushroom. Enjoy displaying it as part of your fall decorations!
Customization Ideas
One of the most enjoyable aspects of crocheting is the ability to personalize your projects. With this crochet mushroom pattern, there are countless ways to make each mushroom unique and reflective of your style. Here are some fun ideas to inspire your creativity:
- Color Variations: While the classic red, white, and brown colors are perfect for fall, don’t hesitate to experiment with different color combinations. Consider using pastel shades for a whimsical look or earthy tones for a more natural feel. You can even create a rainbow of mushrooms to brighten up your space!
- Embellishments: Add extra charm to your mushrooms by incorporating embellishments. Use embroidery thread to stitch tiny flowers or leaves around the base of the stem. You can also attach small beads or buttons to the cap for a playful touch. If you’re feeling adventurous, try adding a cute face with safety eyes or felt pieces.
- Size Variations: Create a family of mushrooms by varying the sizes. You can easily adjust the number of rounds for the cap and stem to make smaller or larger mushrooms. This not only adds visual interest but also allows you to create a delightful display of mushrooms in different heights.
- Textured Stitches: For an added layer of detail, consider using textured stitches like bobbles or puff stitches on the cap. This will give your mushrooms a unique look and feel, making them stand out even more.
- Seasonal Themes: While these mushrooms are perfect for fall, you can adapt them for other seasons as well. Use pastel colors for spring, bright colors for summer, or even white and silver for a winter wonderland theme. The possibilities are endless!
Don’t forget to share your creations and variations with the crochet community! Whether you post on social media or join a crochet group, showcasing your personalized mushrooms can inspire others and spark new ideas. Happy crocheting!
Care Instructions
Taking care of your finished crochet mushrooms will help them last for many seasons to come. Here are some practical tips for cleaning and storing your adorable creations:
- Cleaning: If your mushrooms get dusty or dirty, gently wipe them with a damp cloth. For more stubborn stains, you can spot clean with a mild soap solution. Avoid soaking them in water, as this can distort their shape.
- Storage: When not in use, store your crochet mushrooms in a cool, dry place. Keep them in a breathable bag or a box to protect them from dust and moisture. Avoid placing heavy items on top of them to maintain their shape.
- Display: These mushrooms make charming decorations for your home, especially during the fall season. You can place them on shelves, tables, or even use them as part of a seasonal centerpiece. Their whimsical design adds a touch of fun to any space.
- Gift Ideas: Crochet mushrooms also make delightful gifts for friends and family. Consider pairing them with other handmade items or creating a small gift basket filled with seasonal treats. Personalizing your mushrooms with different colors or embellishments can make them even more special for the recipient.
With proper care, your crochet mushrooms will continue to bring joy and charm to your home or make thoughtful gifts for years to come!
Conclusion
Creating your own crochet mushrooms is not only a fun and engaging project but also a wonderful way to celebrate the beauty of fall. With this crochet mushroom pattern, you can enjoy the satisfaction of crafting charming decorations that add a whimsical touch to your home.
As you work through the pattern, you’ll find joy in the process of crocheting, from the initial magic ring to the final touches on your mushrooms. Each piece you create can be a reflection of your personal style, allowing for endless customization and creativity.
So gather your materials, pick your favorite colors, and dive into this delightful crochet adventure. Whether you’re making a few mushrooms for yourself or crafting a whole family to share with loved ones, you’re sure to enjoy every stitch. Happy crocheting!
Print
Crochet Mushroom Pattern That’s Perfect for Fall – Easy Guide
- Total Time: 40 minutes
- Yield: 2-3 mushrooms
- Diet: Vegan
Description
A simple and fun crochet mushroom pattern that is perfect for fall decorations.
Ingredients
- Yarn in red, white, and brown
- Crochet hook (size G/4.0mm)
- Scissors
- Tapestry needle
- Stuffing (optional)
Instructions
- Start with a magic ring and crochet 6 single crochets into the ring.
- Increase in each stitch for the next round (12 stitches).
- Continue to increase until you reach the desired size for the mushroom cap.
- Switch to white yarn and create the mushroom stem using single crochets.
- Attach the cap to the stem securely.
- Add details like spots on the cap using a contrasting color.
- Stuff the mushroom if desired and weave in any loose ends.
Notes
- This pattern can be customized with different colors.
- Use safety eyes for a cute face if desired.
- Store finished mushrooms in a cool, dry place.
- Prep Time: 10 minutes
- Cook Time: 30 minutes
- Category: Craft
- Method: Crocheting
- Cuisine: N/A
Nutrition
- Serving Size: N/A
- Calories: N/A
- Sugar: N/A
- Sodium: N/A
- Fat: N/A
- Saturated Fat: N/A
- Unsaturated Fat: N/A
- Trans Fat: N/A
- Carbohydrates: N/A
- Fiber: N/A
- Protein: N/A
- Cholesterol: N/A