
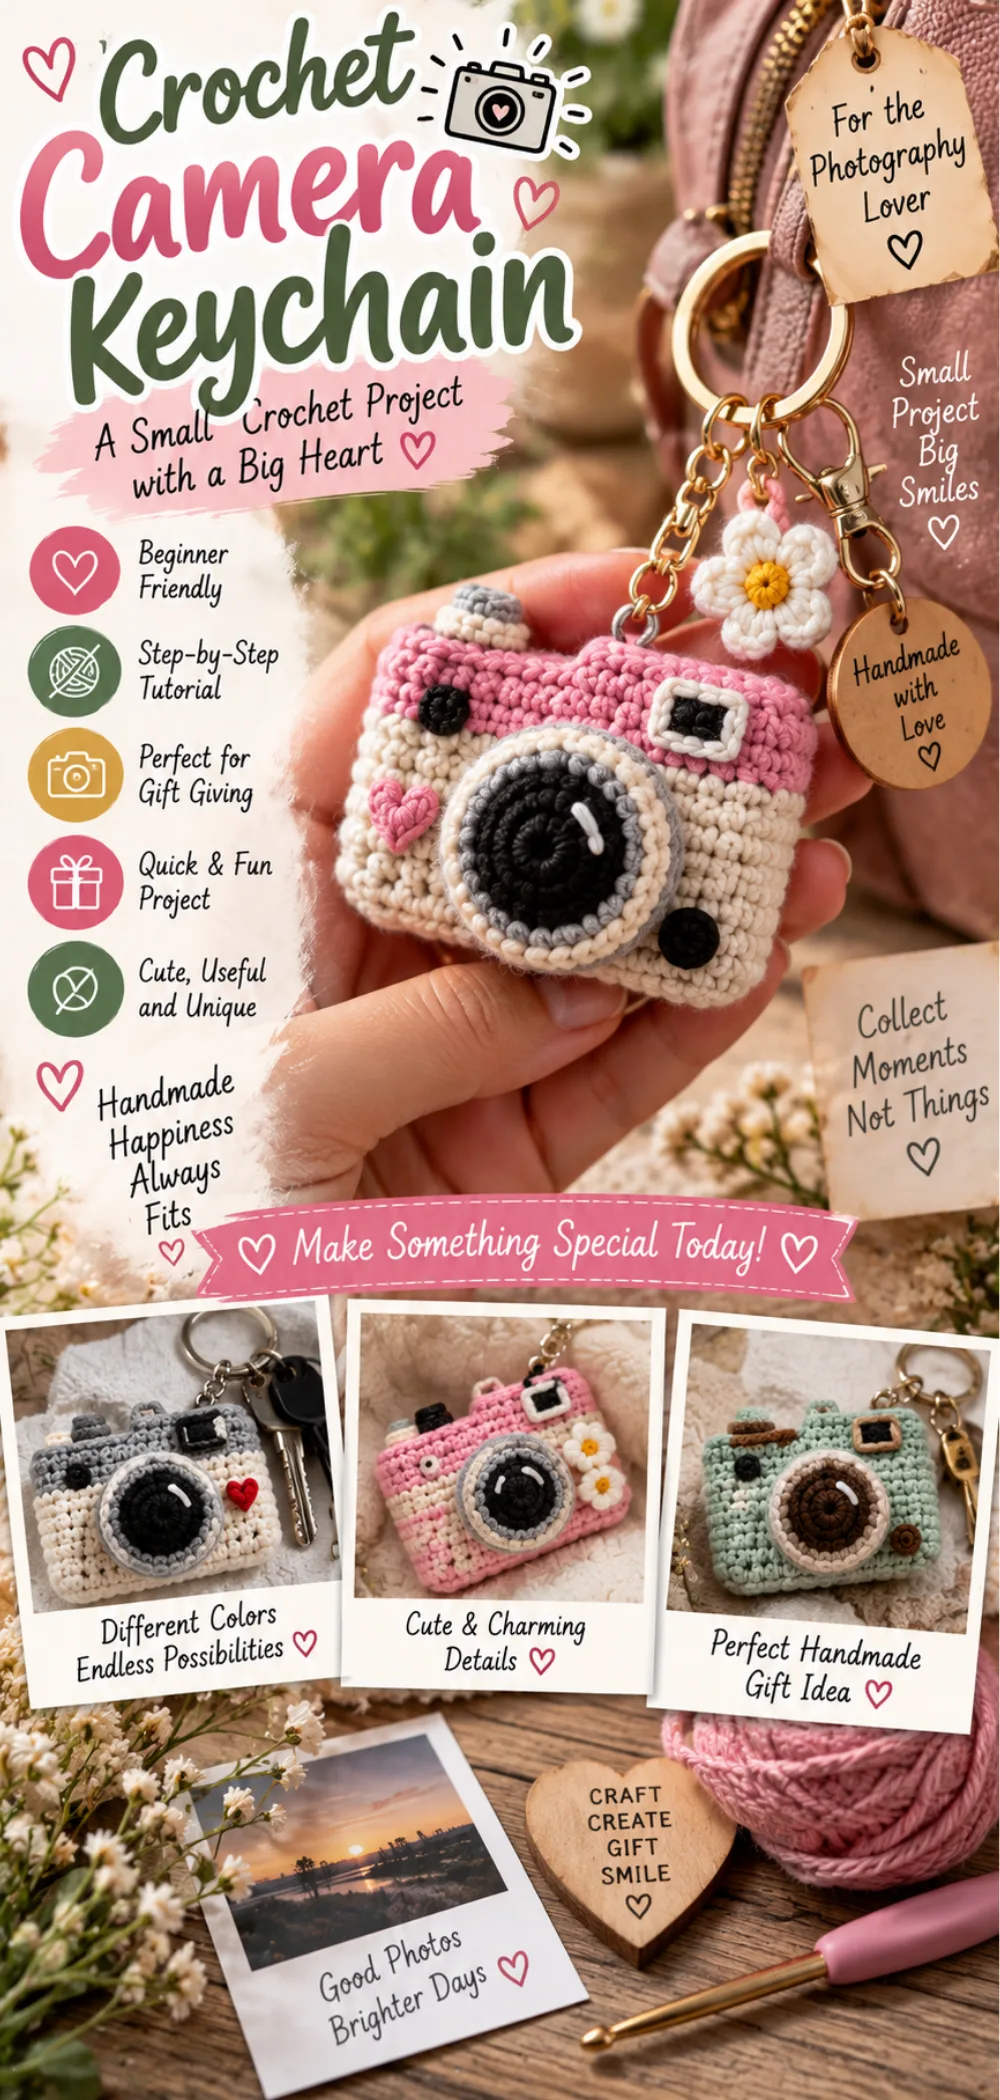
Step-by-Step Instructions for the Adorable Crochet Camera Keychain
1. Create a Magic Ring: Start with your main color yarn. Make a loop and pull the working yarn through to form a magic ring.
2. Form the Base: Work 6 single crochet (sc) stitches into the magic ring. Pull the tail of the yarn to close the ring. You should have 6 stitches in total.
3. Build the Camera Body: Change to your accent color. In the first stitch of the next round, work 2 single crochet (sc) stitches to increase. Continue to work 1 single crochet (sc) in the next stitch, then 2 single crochet (sc) in the following stitch. Repeat this pattern around until you have a total of 12 stitches.
4. Add Details: For the next round, continue with the accent color. Work 1 single crochet (sc) in each stitch around for a total of 12 stitches. To create the lens, switch to a different color and work a small circle using 6 single crochet (sc) stitches in a magic ring. Attach this to the front of the camera body.
5. Stuff the Camera: Lightly stuff the camera with fiberfill to give it a 3D effect. Be careful not to overstuff, as it should maintain its shape without bulging.
6. Close the Top: To finish off the top of the camera, work 1 single crochet (sc) in each stitch around for the next round. After completing the round, slip stitch (sl st) to the first stitch to join. Attach the keychain ring to the top of the camera by threading it through the last stitch.
7. Weave in Ends: Use a tapestry needle to weave in any loose ends from your yarn. This will give your keychain a neat and polished look.
Introduction / About This Adorable Crochet Camera Keychain for Gift and Craft Inspiration
Welcome to the delightful world of crochet! Today, we’re diving into a fun project that will inspire your creativity: the adorable crochet camera keychain. This charming little accessory is not only a practical item to keep your keys organized, but it also makes for a thoughtful gift for friends and family.
This project is perfect for beginners, as it utilizes basic crochet techniques that are easy to master. You can customize your keychain with various colors, allowing you to create a unique piece that reflects your personal style or the preferences of the recipient.
Handmade gifts carry a special sentiment, and this crochet camera keychain is sure to bring a smile to anyone who receives it. Whether you’re looking to add a personal touch to your gift-giving or simply want to create something special for yourself, this keychain is a delightful addition to any collection.
IMAGE: A vibrant, well-lit photo of the finished crochet camera keychain, showcasing its details and colors against a soft, neutral background.
ALT: Adorable crochet camera keychain for gift and craft inspiration.
Crochet Pattern Quick Overview
| Detail | Information |
| Skill Level | Beginner |
| Crochet Terminology | US Terms |
| Yarn Weight | Worsted Weight |
| Crochet Hook Size | 4.0 mm (G-6) |
| Approximate Finished Size | 3 inches x 2 inches |
| Approximate Working Time | 40 minutes |
| Construction Method | Worked in rounds |
| Crochet Technique | Amigurumi |
| Pattern Type | Free crochet pattern |
About This Adorable Crochet Camera Keychain for Gift and Craft Inspiration
The adorable crochet camera keychain is constructed using simple yet effective techniques that make it a joy to create. This project is worked in rounds, which helps to form a delightful 3D effect that gives the keychain its charming shape. By working in rounds, you can easily build up the body of the camera, making it look more realistic and fun.
As you embark on this project, you’ll be using basic crochet skills that are perfect for beginners. The magic ring technique is essential for starting the keychain, allowing you to create a tight center for your work. You’ll also be using single crochet stitches throughout the project, which are fundamental to many crochet patterns. Additionally, you’ll have the opportunity to practice color changes, adding a playful touch to your creation.
One of the most enjoyable aspects of making this keychain is the ability to personalize it with different colors and embellishments. You can choose your favorite yarn shades for the camera body, lens, and flash, making each keychain unique. Consider adding safety eyes or other decorative elements to enhance its character. This customization not only makes the keychain special for you but also allows you to create thoughtful gifts for friends and family.
Materials and Supplies
To create your adorable crochet camera keychain, you will need a few essential materials. Choosing the right colors for your yarn is crucial, as it will enhance the overall look of your keychain and make it more vibrant. Here’s a list of what you’ll need:
- Yarn in various colors (main color, accent color)
- Crochet hook (size appropriate for yarn)
- Scissors
- Tapestry needle
- Keychain ring
Using the correct yarn weight and hook size is important for achieving the desired finished size of your keychain. For this project, a worsted weight yarn is recommended, as it provides the right balance of thickness and flexibility. A 4.0 mm (G-6) crochet hook is ideal for working with worsted weight yarn, ensuring that your stitches are tight enough to maintain the shape of the camera.
IMAGE: A neatly arranged display of the required yarn, crochet hook, scissors, tapestry needle, and keychain ring.
ALT: Materials for the adorable crochet camera keychain project.
Best Yarn for Adorable Crochet Camera Keychain
For the adorable crochet camera keychain, a worsted weight yarn in various colors is recommended. This yarn weight is perfect for creating a sturdy yet soft keychain. You can choose acrylic yarn for its durability and ease of care, or cotton yarn for a more natural feel. Both options will work well for this project.
When selecting your yarn, consider using approximately 50-100 yards of the main color and 20-30 yards of the accent color. This will give you enough yarn to complete the keychain while allowing for some creative freedom in your color choices.
Suitable Yarn Substitutions
If you don’t have worsted weight yarn on hand, there are several suitable substitutions. You can use a lighter weight yarn, but be sure to adjust your hook size accordingly to maintain the correct gauge. Always check your gauge to ensure that your finished keychain will be the right size.
Different fibers can affect the final look and feel of your keychain. For example, using a soft, plush yarn can give your keychain a cozy appearance, while a more structured yarn can help maintain its shape better. Experiment with different yarns to find the combination that works best for you!
Crochet Hook and Additional Tools
For this project, you will need a 4.0 mm (G-6) crochet hook. This size is perfect for working with worsted weight yarn and will help you achieve the right tension in your stitches.
In addition to your crochet hook, you will need a pair of scissors to cut your yarn, a tapestry needle for weaving in ends, and a keychain ring to finish off your project. Each of these tools plays a vital role in creating your adorable crochet camera keychain, ensuring that it is both functional and beautifully crafted.
Crochet Stitches and Techniques Used
To create the adorable crochet camera keychain, you’ll be using a few basic stitches and techniques that are essential for this project. Familiarizing yourself with these will help you achieve the desired results and make the process enjoyable. Below are the key stitches and techniques you’ll need:
Single Crochet Stitch
The single crochet stitch (sc) is the primary stitch used to create the body of the camera. It is a simple stitch that provides a tight and sturdy fabric, making it perfect for amigurumi projects like this keychain. To work a single crochet, you insert your hook into the stitch, yarn over, pull up a loop, yarn over again, and pull through both loops on the hook. This stitch is repeated throughout the project to build the camera’s shape.
IMAGE: A close-up of the single crochet stitch, highlighting the stitch structure.
ALT: Single crochet stitch used in the adorable crochet camera keychain.
Magic Ring Technique
The magic ring technique is crucial for starting the keychain project. It allows you to create a tight center for your work, which is especially important for small projects like this one. To make a magic ring, you wrap the yarn around your fingers to form a loop, then insert your hook into the loop, yarn over, and pull up a loop. From there, you can work your stitches into the ring. This technique ensures that your starting stitches are snug and prevents gaps in your work.
Using the magic ring will give your crochet camera a neat and polished look, making it a delightful addition to your keychain collection.
Crochet Abbreviations
| Abbreviation | Meaning |
|---|---|
| ch | chain |
| sc | single crochet |
| st | stitch |
| rnd | round |
| sl st | slip stitch |
| inc | increase |
| dec | decrease |
Gauge
Gauge is an essential aspect of crochet, especially for projects like the adorable crochet camera keychain, where the finished size is small and specific. Achieving the correct gauge ensures that your keychain will turn out the right dimensions and maintain its intended shape. If your gauge is off, the keychain may end up larger or smaller than expected, which can affect its functionality as a keychain.
To check your gauge, it’s helpful to create a gauge swatch. For this project, you can make a swatch of 4 inches by 4 inches using the same yarn and hook you plan to use for the keychain. Here’s how to measure your gauge accurately:
- Using your 4.0 mm (G-6) crochet hook and worsted weight yarn, work a series of single crochet stitches until your swatch measures at least 4 inches wide.
- Count the number of single crochet stitches across the width of your swatch. This will give you the stitch count per inch.
- To measure the row gauge, count the number of rows in the same 4-inch section. This will provide you with the row count per inch.
For example, if you find that you have 10 single crochet stitches in 4 inches, your gauge is 2.5 stitches per inch. If your gauge does not match the recommended gauge, you may need to adjust your hook size. A larger hook will create a looser fabric, while a smaller hook will create a tighter fabric.
By ensuring that your gauge is accurate, you can confidently proceed with your adorable crochet camera keychain, knowing that it will turn out just as you envision!
Step-by-Step Instructions for the Adorable Crochet Camera Keychain
1. Create a Magic Ring: Start with your main color yarn. Make a loop and pull the working yarn through to form a magic ring.
2. Form the Base: Work 6 single crochet (sc) stitches into the magic ring. Pull the tail of the yarn to close the ring. You should have 6 stitches in total.
3. Build the Camera Body: Change to your accent color. In the first stitch of the next round, work 2 single crochet (sc) stitches to increase. Continue to work 1 single crochet (sc) in the next stitch, then 2 single crochet (sc) in the following stitch. Repeat this pattern around until you have a total of 12 stitches.
4. Add Details: For the next round, continue with the accent color. Work 1 single crochet (sc) in each stitch around for a total of 12 stitches. To create the lens, switch to a different color and work a small circle using 6 single crochet (sc) stitches in a magic ring. Attach this to the front of the camera body.
5. Stuff the Camera: Lightly stuff the camera with fiberfill to give it a 3D effect. Be careful not to overstuff, as it should maintain its shape without bulging.
6. Close the Top: To finish off the top of the camera, work 1 single crochet (sc) in each stitch around for the next round. After completing the round, slip stitch (sl st) to the first stitch to join. Attach the keychain ring to the top of the camera by threading it through the last stitch.
7. Weave in Ends: Use a tapestry needle to weave in any loose ends from your yarn. This will give your keychain a neat and polished look.
Tips for Customization and Personalization
One of the most enjoyable aspects of creating your adorable crochet camera keychain is the opportunity to customize it to your liking. Don’t hesitate to experiment with different colors and embellishments! You can choose vibrant shades for the camera body, or opt for pastel tones for a softer look. The choice is entirely yours, and it allows you to create a keychain that truly reflects your personal style.
For an extra touch of charm, consider adding safety eyes or other decorative elements. Safety eyes can give your keychain a playful character, making it even more appealing. You might also think about incorporating small buttons, beads, or even embroidery to enhance the details of your camera keychain. These little additions can make your project stand out and feel unique.
This keychain also makes for a thoughtful gift or party favor. You can create a set of keychains in different colors and styles to give to friends or family members. They can be perfect for birthdays, holidays, or just as a surprise to brighten someone’s day. Additionally, consider packaging them in a small gift box or bag to add a special touch to your gift-giving.
With a little creativity, your adorable crochet camera keychain can become a cherished keepsake or a delightful gift that showcases your crafting skills!
Care Instructions
To ensure that your adorable crochet camera keychain maintains its shape and appearance, it’s important to take proper care of it. Here are some helpful tips:
- Gentle Cleaning: If your keychain gets dirty, gently spot clean it with a damp cloth. Avoid soaking it in water, as this can cause the yarn to lose its shape.
- Avoid Excessive Moisture: Keep your keychain away from excessive moisture or humidity, as this can lead to mold or mildew. If it gets wet, allow it to air dry completely before using it again.
- Store Properly: When not in use, store your keychain in a cool, dry place. This will help maintain its shape and prevent any stretching or deformation.
- Avoid Direct Sunlight: Prolonged exposure to direct sunlight can cause the colors of your yarn to fade. Store your keychain away from direct sunlight to keep its vibrant colors intact.
By following these care instructions, you can enjoy your adorable crochet camera keychain for years to come, keeping it looking fresh and delightful!
Conclusion
Creating the adorable crochet camera keychain is not just a fun project; it’s also a wonderful way to express your creativity and share joy with others. As you work through the steps, you’ll find satisfaction in crafting something unique and personal.
This keychain serves as a delightful gift for friends and family, showcasing the love and effort you put into making it. Whether you choose vibrant colors or soft pastels, each keychain can reflect the personality of its recipient, making it a cherished keepsake.
So gather your materials, follow the steps, and enjoy the process of crocheting this charming accessory. Happy crocheting!
Print
Adorable Crochet Camera Keychain – Easy Step-by-Step Pattern
- Total Time: 40 minutes
- Yield: 1 keychain
- Diet: Vegan
Description
A delightful crochet pattern for creating an adorable camera keychain, perfect for gifts and craft inspiration.
Ingredients
- Yarn in various colors (main color, accent color)
- Crochet hook (size appropriate for yarn)
- Scissors
- Tapestry needle
- Keychain ring
Instructions
- Start by creating a magic ring with your main color yarn.
- Work single crochet stitches into the ring to form the base of the camera.
- Change to the accent color and continue crocheting to form the camera body.
- Add details like the lens and flash using different colors.
- Once the body is complete, stuff it lightly with fiberfill.
- Close the top of the camera and attach the keychain ring.
- Weave in any loose ends with a tapestry needle.
Notes
- This pattern is beginner-friendly and can be customized with different colors.
- Consider using safety eyes for added detail.
- Store in a cool, dry place to maintain shape.
- Prep Time: 10 minutes
- Cook Time: 30 minutes
- Category: Craft
- Method: Crocheting
- Cuisine: N/A
Nutrition
- Serving Size: N/A
- Calories: N/A
- Sugar: N/A
- Sodium: N/A
- Fat: N/A
- Saturated Fat: N/A
- Unsaturated Fat: N/A
- Trans Fat: N/A
- Carbohydrates: N/A
- Fiber: N/A
- Protein: N/A
- Cholesterol: N/A