
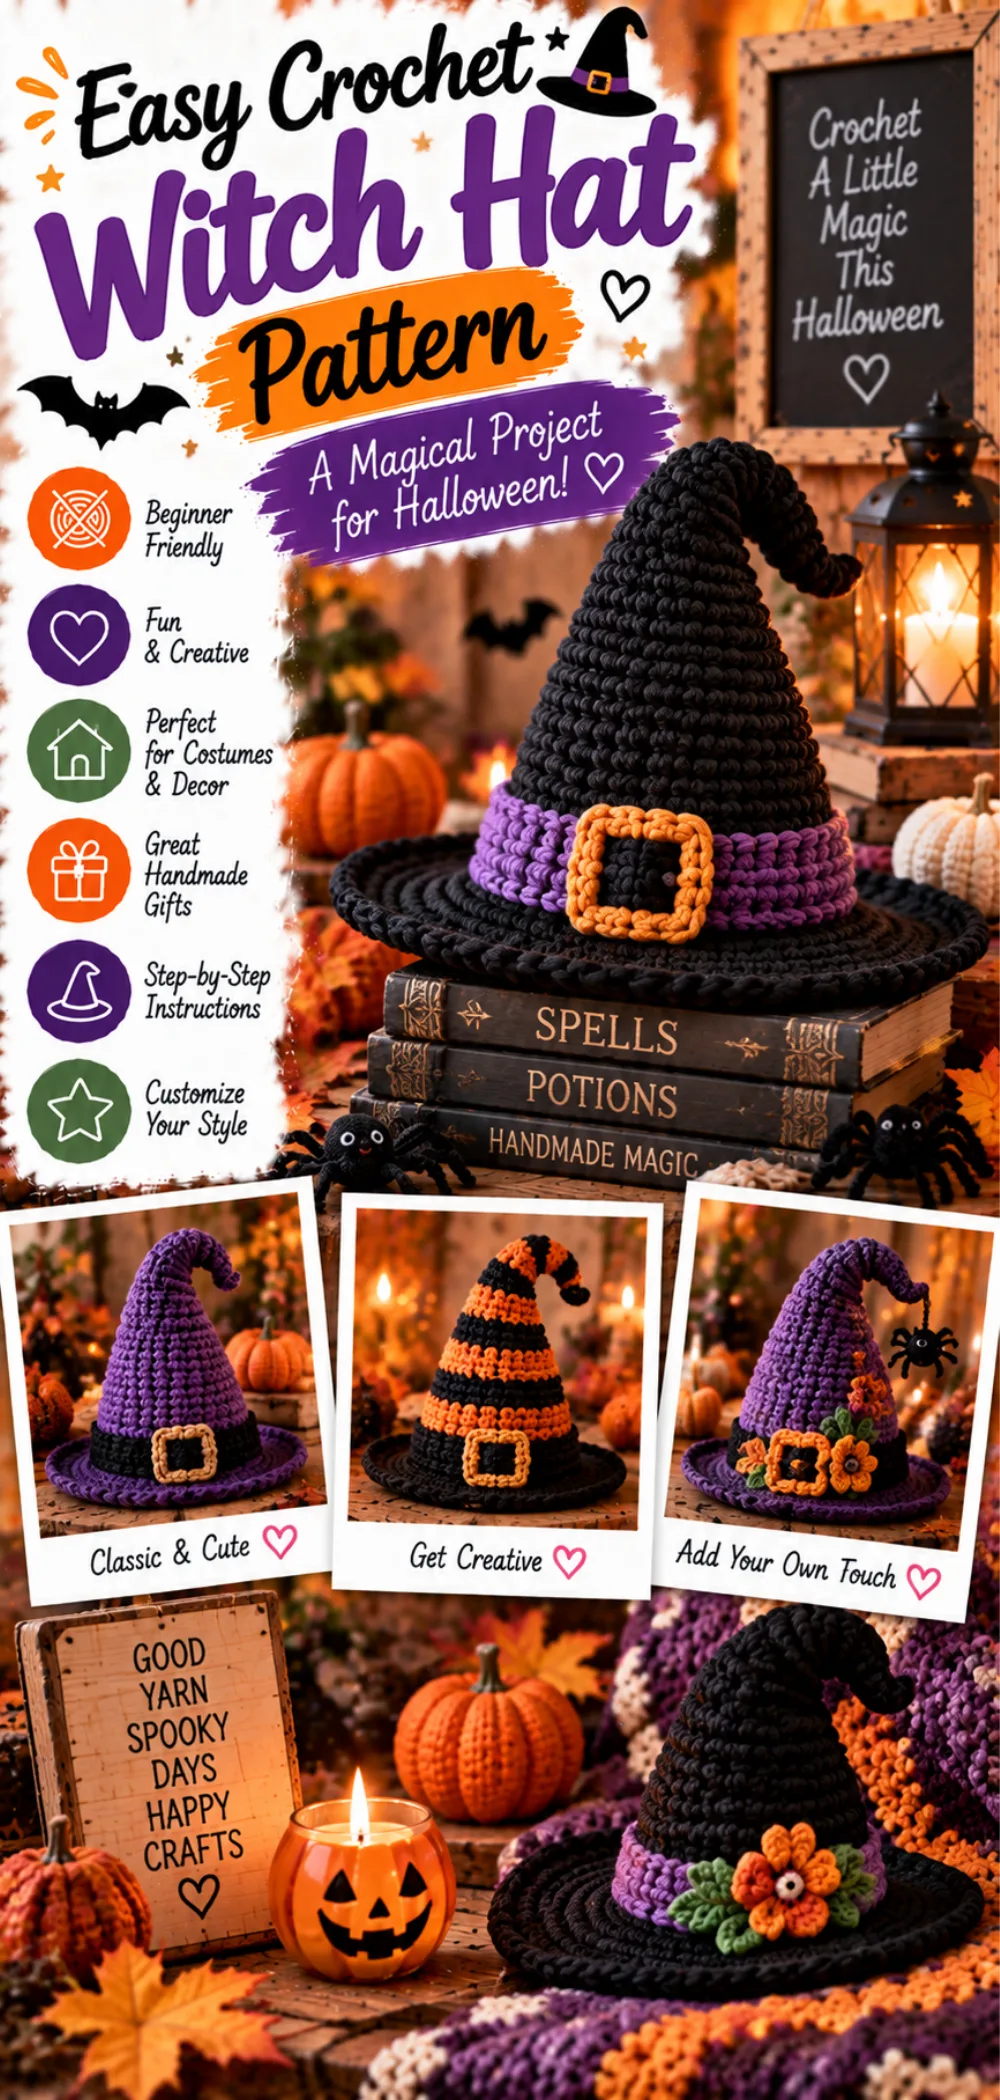
Step-by-Step Instructions for Easy Crochet Witch Hat Pattern for Halloween
1. Start with a Magic Ring: Create a magic ring. To do this, wrap the yarn around your fingers to form a loop, then insert your hook into the loop. Yarn over and pull through to create your first stitch. Crochet a few stitches (about 6 single crochets) into the magic ring to form the base of the hat.
2. Increase Stitches: Work in rounds to create the cone shape of the hat. For Round 1, crochet 2 single crochets (sc) into each stitch around. You should have 12 stitches at the end of this round. For Round 2, increase by crocheting 1 sc in the first stitch, then 2 sc in the next stitch, repeating this pattern around. You will have 18 stitches at the end of Round 2. Continue increasing in this manner for several rounds, following the pattern of increasing every other stitch until you reach your desired height for the cone.
3. Switch to Purple Yarn: Once you have reached the desired height, switch to your purple yarn. To do this, simply pull the purple yarn through the last stitch of the previous round and continue crocheting with the new color. Create a decorative band around the base of the hat by crocheting 1 round of single crochet stitches. This band can be as wide as you like, but 2-3 rounds is a good starting point.
4. Finish Off: After completing the decorative band, finish off your work by cutting the yarn, leaving a long tail. Pull the tail through the last stitch to secure it. Weave in any loose ends using a tapestry needle to ensure a clean finish.
5. Optional Embellishments: For a personal touch, consider adding embellishments such as a ribbon or a buckle. You can sew these onto the hat using your tapestry needle and some leftover yarn. Get creative with your decorations to make your witch hat truly unique!
Introduction / About This Easy Crochet Witch Hat Pattern for Halloween
Welcome to this fun and festive project where you’ll learn to create an easy crochet witch hat for Halloween! This pattern is designed to be accessible for both beginners and intermediate crocheters, making it a perfect choice for anyone looking to add a handmade touch to their Halloween celebrations.
The construction of the witch hat is straightforward, starting with a magic ring and working in rounds to form a charming cone shape. As you crochet, you’ll enjoy the process of watching your hat take shape, and the best part is that you can personalize it to match your style. Whether you prefer classic black or a splash of color, this project allows for plenty of creativity.
So grab your yarn and hook, and let’s dive into this delightful crochet adventure! Remember, the most important part is to have fun and make the hat your own.
IMAGE: A finished crochet witch hat displayed on a rustic wooden table, with a spooky Halloween backdrop featuring pumpkins and cobwebs.
ALT: Easy Crochet Witch Hat Pattern for Halloween displayed with Halloween decorations.
Crochet Pattern Quick Overview
| Detail | Information |
| Skill Level | Beginner to Intermediate |
| Crochet Terminology | US Terms |
| Yarn Weight | Worsted Weight |
| Crochet Hook Size | H/8 (5mm) |
| Approximate Finished Size | Adjustable (Child to Adult) |
| Approximate Working Time | 1 hour 10 minutes |
| Construction Method | Worked in rounds |
| Crochet Technique | Basic stitches and increases |
| Pattern Type | Free Crochet Pattern |
About This Easy Crochet Witch Hat Pattern for Halloween
This easy crochet witch hat is constructed in rounds, beginning with a magic ring that forms the base of the hat. The magic ring allows for a tight center, ensuring that your hat has a neat and polished look. From this starting point, you will work in continuous rounds to create the iconic cone shape of the witch hat.
To achieve the cone shape, you will use an increasing method. This involves adding extra stitches in each round, which gradually widens the hat as you crochet upwards. By strategically placing increases, you can control the height and shape of the hat, making it adjustable for different sizes.
Once you have reached the desired height, you will switch to a contrasting color, typically purple, to create a decorative band around the base of the hat. This band adds a fun pop of color and can be customized in width according to your preference. Additionally, you can personalize your witch hat further by adding embellishments such as ribbons, buckles, or other spooky decorations, making it a unique piece for your Halloween festivities.
Materials and Supplies
To create your easy crochet witch hat, you will need the following materials. Choosing the right yarn is crucial for the hat’s structure and appearance, so be sure to select quality materials that will hold their shape and look great.
- Worsted weight yarn (black)
- Worsted weight yarn (purple)
- Crochet hook (size H/8 – 5mm)
- Scissors
- Tapestry needle
IMAGE: Neatly arranged materials including black and purple yarn, a crochet hook, scissors, and a tapestry needle.
ALT: Materials for Easy Crochet Witch Hat Pattern for Halloween including yarn and tools.
Best Yarn for Easy Crochet Witch Hat Pattern for Halloween
For a classic witch hat look, it is recommended to use worsted weight yarn in black and purple. These colors not only embody the Halloween spirit but also provide a striking contrast that enhances the hat’s design. Acrylic yarn is a great choice due to its durability and ease of care, making it suitable for repeated use during Halloween festivities. Cotton yarn is another excellent option, offering breathability and a nice drape.
As for yardage, you will need approximately:
- Black yarn: 100 yards
- Purple yarn: 50 yards
Suitable Yarn Substitutions
If you wish to explore different yarn options, consider using blends or specialty yarns that can add unique textures or colors to your witch hat. Just ensure that the yarn you choose is of a similar weight to worsted weight to maintain the hat’s structure. Always check your gauge and total yardage when substituting yarns to ensure a proper fit and finish.
Crochet Hook and Additional Tools
You will need a size H/8 (5mm) crochet hook for this project. This size is ideal for working with worsted weight yarn and will help you achieve the right tension for your stitches. Additionally, having scissors on hand will be necessary for cutting your yarn, and a tapestry needle will be essential for weaving in any loose ends once your hat is complete.
If you find it helpful, consider using stitch markers to keep track of your rounds, especially as you work on the increases. This can help you maintain an even stitch count and keep your project organized.
Crochet Stitches and Techniques Used
In this easy crochet witch hat pattern, you will primarily use basic stitches and techniques that are essential for creating the structure and shape of the hat. The two main techniques involved are single crochet and increasing stitches. Familiarity with these stitches will help you successfully complete the project.
Single Crochet
Single crochet (sc) is the foundational stitch used throughout the witch hat. It creates a dense and sturdy fabric, which is perfect for maintaining the shape of the hat. To work a single crochet, insert your hook into the stitch, yarn over, pull up a loop, yarn over again, and pull through both loops on your hook. This simple stitch is repeated in each round to build the body of the hat.
IMAGE: Close-up of single crochet stitches in the witch hat, showing the stitch structure clearly.
ALT: Single crochet stitches used in the Easy Crochet Witch Hat Pattern for Halloween.
Increasing Stitches
Increasing stitches is a technique used to shape the cone of the witch hat. This involves adding extra stitches in specific rounds to widen the hat as you work upwards. For example, in the initial rounds, you will crochet two single crochets into the same stitch (this is called an increase) to create a wider base. As you continue, you will follow a pattern of increasing every few stitches to gradually form the desired cone shape. This technique is crucial for achieving the iconic silhouette of a witch hat.
Crochet Abbreviations
| Abbreviation | Meaning |
|---|---|
| ch | chain |
| sc | single crochet |
| inc | increase |
| sl st | slip stitch |
| st | stitch |
Gauge
Gauge is an essential aspect of crocheting, especially for projects like the easy crochet witch hat. It refers to the number of stitches and rows per inch in your crochet work. Ensuring that your gauge matches the pattern’s specifications is crucial for achieving the correct size and fit of the hat. If your gauge is off, the finished hat may be too small or too large, which can affect its overall appearance and wearability.
To check your gauge, you can create a gauge swatch. For this project, crochet a square measuring 4 inches by 4 inches using the same yarn and hook you plan to use for the hat. Count the number of single crochet stitches and rows within that square. The standard gauge for this pattern is:
- 12 single crochets (sc) = 4 inches
- 12 rows = 4 inches
If your gauge does not match, you can adjust your hook size. If your swatch is too small, try using a larger hook. If it’s too large, switch to a smaller hook. Always remember to recheck your gauge after making any adjustments to ensure the best fit for your witch hat.
Step-by-Step Instructions for Easy Crochet Witch Hat Pattern for Halloween
1. Start with a Magic Ring: Create a magic ring. To do this, wrap the yarn around your fingers to form a loop, then insert your hook into the loop. Yarn over and pull through to create your first stitch. Crochet a few stitches (about 6 single crochets) into the magic ring to form the base of the hat.
2. Increase Stitches: Work in rounds to create the cone shape of the hat. For Round 1, crochet 2 single crochets (sc) into each stitch around. You should have 12 stitches at the end of this round. For Round 2, increase by crocheting 1 sc in the first stitch, then 2 sc in the next stitch, repeating this pattern around. You will have 18 stitches at the end of Round 2. Continue increasing in this manner for several rounds, following the pattern of increasing every other stitch until you reach your desired height for the cone.
3. Switch to Purple Yarn: Once you have reached the desired height, switch to your purple yarn. To do this, simply pull the purple yarn through the last stitch of the previous round and continue crocheting with the new color. Create a decorative band around the base of the hat by crocheting 1 round of single crochet stitches. This band can be as wide as you like, but 2-3 rounds is a good starting point.
4. Finish Off: After completing the decorative band, finish off your work by cutting the yarn, leaving a long tail. Pull the tail through the last stitch to secure it. Weave in any loose ends using a tapestry needle to ensure a clean finish.
5. Optional Embellishments: For a personal touch, consider adding embellishments such as a ribbon or a buckle. You can sew these onto the hat using your tapestry needle and some leftover yarn. Get creative with your decorations to make your witch hat truly unique!
Tips for Personalizing Your Witch Hat
Personalizing your easy crochet witch hat is a fantastic way to make it truly your own! Here are some creative suggestions to help you customize your hat:
- Experiment with Colors: While the classic black and purple combination is a favorite, don’t hesitate to try other color schemes. Consider using orange, green, or even glittery yarn for a magical touch. You can also create stripes or patterns by alternating colors in different rounds.
- Add Embellishments: Enhance your witch hat with fun embellishments. Ribbons, buttons, or fabric flowers can add a unique flair. You might also consider sewing on a small buckle or attaching a felt spider or bat for a spooky effect. Get creative with your decorations!
- Try Different Yarn Textures: Using yarns with different textures can create interesting visual effects. Consider using a fluffy or sparkly yarn for the decorative band or even a textured yarn for the main body of the hat. This can add depth and dimension to your project.
- Adjust the Size: Since this pattern is adjustable, you can easily modify the size of the hat. If you want a smaller hat for a child or a larger one for an adult, simply adjust the number of rounds or the number of increases. This allows you to create a hat that fits perfectly!
- Incorporate Seasonal Themes: If you want to use your witch hat beyond Halloween, consider incorporating seasonal themes. For example, you could add autumn leaves or flowers for a fall look, or even a winter theme with snowflakes and icy colors.
Remember, the most important part of this project is to have fun and let your creativity shine. Each witch hat can be a reflection of your personal style, so don’t be afraid to experiment and make it uniquely yours!
Care Instructions
To keep your easy crochet witch hat looking its best, it’s important to follow proper care instructions. Here are some tips for washing and storing your finished hat:
Washing Your Witch Hat
When it comes to washing your crochet witch hat, hand washing is the safest method to preserve its shape and texture. Here’s how to do it:
- Fill a basin: Use cool or lukewarm water and add a gentle detergent suitable for delicate fabrics.
- Submerge the hat: Gently place your witch hat in the water, allowing it to soak for about 10-15 minutes. Avoid agitating or scrubbing the fabric to prevent stretching.
- Rinse thoroughly: After soaking, carefully rinse the hat under cool running water until all soap is removed. Be gentle to maintain the hat’s shape.
- Remove excess water: Press the hat between two clean towels to absorb excess moisture. Do not wring or twist the hat, as this can distort its shape.
Drying Your Witch Hat
To dry your witch hat, follow these steps:
- Reshape the hat: While it’s still damp, gently reshape the hat to its original form. You can use your hands to smooth out any wrinkles or creases.
- Air dry: Place the hat on a flat surface or a hat form to dry completely. Avoid direct sunlight or heat sources, as these can cause the yarn to fade or become misshapen.
Storing Your Witch Hat
Proper storage is key to maintaining the shape of your crochet witch hat:
- Store flat: To prevent crushing, store your witch hat flat rather than hanging it. This will help maintain its cone shape.
- Avoid heavy items: Keep the hat away from heavy objects that could press down on it and alter its shape.
- Use a dust bag: If you want to protect your hat from dust, consider placing it in a breathable dust bag or a box with some tissue paper to help retain its form.
By following these care instructions, you can ensure that your easy crochet witch hat remains a delightful addition to your Halloween celebrations for years to come!
Conclusion
Congratulations on completing your easy crochet witch hat! We hope you enjoyed the process and are excited to show off your creation. We encourage you to share your finished witch hats on social media and tag this tutorial. It’s always wonderful to see how each crocheter adds their unique touch to the project!
If you’re looking for more crochet inspiration, be sure to explore our other crochet patterns and tutorials for Halloween and beyond. There are plenty of fun projects waiting for you to dive into. Happy crocheting!
Print
Easy Crochet Witch Hat Pattern for Halloween – Free Step-by-Step Tutorial
- Total Time: 1 hour 10 minutes
- Yield: 1 witch hat
- Diet: Vegan
Description
A simple and fun crochet pattern to create a witch hat for Halloween.
Ingredients
- Worsted weight yarn (black)
- Worsted weight yarn (purple)
- Crochet hook (size H/8 – 5mm)
- Scissors
- Tapestry needle
Instructions
- Start with a magic ring and crochet a few stitches to form the base of the hat.
- Increase stitches in each round to create the cone shape.
- Switch to purple yarn to create a decorative band around the base of the hat.
- Finish off the hat and weave in any loose ends.
- Optionally, add embellishments like a ribbon or a buckle.
Notes
- This pattern is adjustable for different sizes.
- Use different colors for a unique look.
- Store the hat flat to maintain its shape.
- Prep Time: 10 minutes
- Cook Time: 1 hour
- Category: Craft
- Method: Crocheting
- Cuisine: N/A
Nutrition
- Serving Size: N/A
- Calories: N/A
- Sugar: N/A
- Sodium: N/A
- Fat: N/A
- Saturated Fat: N/A
- Unsaturated Fat: N/A
- Trans Fat: N/A
- Carbohydrates: N/A
- Fiber: N/A
- Protein: N/A
- Cholesterol: N/A