
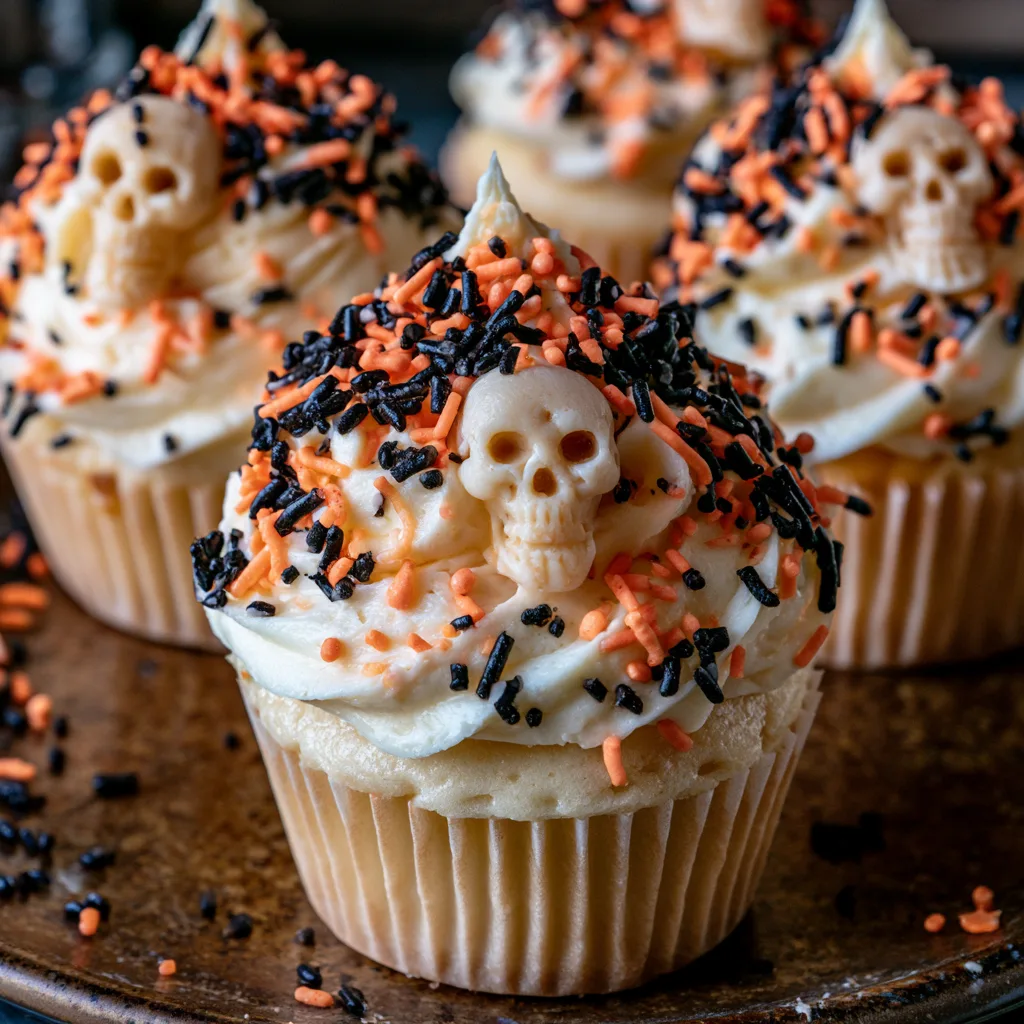
Introduction to Spooky Halloween Skull Cupcake with Cream and Sprinkles
As the leaves turn and the air gets crisp, I can’t help but get excited about Halloween. This Spooky Halloween Skull Cupcake with Cream and Sprinkles is the perfect treat to celebrate the season! Whether you’re a busy mom juggling work and family or a professional looking to impress at a gathering, these cupcakes are a delightful solution. They’re not just delicious; they’re also a fun way to bring a little festive spirit into your kitchen. Plus, who can resist a cupcake that looks like a spooky skull? Let’s dive into this delicious adventure!
Why You’ll Love This Spooky Halloween Skull Cupcake with Cream and Sprinkles
These Spooky Halloween Skull Cupcakes are a breeze to whip up, making them perfect for busy days. With just a few simple steps, you can create a festive treat that’s sure to impress. The rich chocolate flavor combined with the light, fluffy whipped cream is a match made in dessert heaven. Plus, the fun skull decorations will have everyone smiling, making them a hit at any Halloween gathering!
Ingredients for Spooky Halloween Skull Cupcake with Cream and Sprinkles
Gathering the right ingredients is half the fun of baking! For these Spooky Halloween Skull Cupcakes, you’ll need a mix of pantry staples and a few festive touches. Here’s what you’ll need:
- All-purpose flour: This is the backbone of your cupcakes, providing structure and texture.
- Granulated sugar: Sweetness is key! It helps balance the rich cocoa flavor.
- Unsweetened cocoa powder: This gives your cupcakes that deep, chocolatey goodness.
- Baking powder: A leavening agent that helps your cupcakes rise and become fluffy.
- Baking soda: Works with the baking powder to create a light texture.
- Salt: Just a pinch enhances all the flavors in your cupcakes.
- Large eggs: They add moisture and richness, helping bind everything together.
- Vegetable oil: This keeps your cupcakes moist and tender.
- Vanilla extract: A splash of vanilla adds warmth and depth to the flavor.
- Buttermilk: This ingredient brings a tangy flavor and helps keep the cupcakes soft.
- Heavy cream: Essential for whipping up a luscious frosting that’s light and airy.
- Powdered sugar: This sweetens the whipped cream and gives it that perfect frosting consistency.
- Black and white sprinkles: These add a festive touch, making your cupcakes look extra spooky!
- Skull-shaped candy decorations: The finishing touch that transforms your cupcakes into Halloween masterpieces.
For exact measurements, check the bottom of the article where you can find everything listed for easy printing. Feel free to get creative! You can swap out the sprinkles for other fun Halloween-themed decorations or even use a different flavor of frosting if you prefer. Happy baking!
How to Make Spooky Halloween Skull Cupcake with Cream and Sprinkles
Now that we have our ingredients ready, let’s dive into the fun part—making these Spooky Halloween Skull Cupcakes! Follow these simple steps, and you’ll have a batch of deliciously spooky treats in no time.
Step 1: Preheat and Prepare
First things first, preheat your oven to 350°F (175°C). This step is crucial for perfect baking. While the oven warms up, line your cupcake pan with festive cupcake liners. This not only adds a pop of color but also makes cleanup a breeze!
Step 2: Mix Dry Ingredients
In a large bowl, combine the all-purpose flour, granulated sugar, cocoa powder, baking powder, baking soda, and salt. Each ingredient plays a role: flour gives structure, sugar adds sweetness, cocoa provides that rich chocolate flavor, and the baking powder and soda help your cupcakes rise. The salt? It enhances all those delicious flavors!
Step 3: Whisk Wet Ingredients
In a separate bowl, whisk together the eggs, vegetable oil, vanilla extract, and buttermilk. This mixture is key for moisture and richness. The buttermilk adds a lovely tang, while the oil keeps your cupcakes tender. Trust me, this step is where the magic begins!
Step 4: Combine Mixtures
Now, gently combine the wet and dry ingredients. Mix until just combined—don’t overdo it! Overmixing can lead to dense cupcakes, and we want them light and fluffy. A few lumps are perfectly fine!
Step 5: Fill Cupcake Liners
Using a spoon or a scoop, fill each cupcake liner about two-thirds full with batter. This allows room for the cupcakes to rise without overflowing. It’s like giving them a cozy little bed to bake in!
Step 6: Bake
Pop the cupcake pan into the preheated oven and bake for 18-20 minutes. To check for doneness, insert a toothpick into the center of a cupcake. If it comes out clean, they’re ready! If not, give them a few more minutes.
Step 7: Cool Completely
Once baked, remove the cupcakes from the oven and let them cool in the pan for about 5 minutes. Then, transfer them to a wire rack to cool completely. This step is super important! Frosting warm cupcakes can lead to a melty mess.
Step 8: Whip the Cream
In a clean bowl, whip the heavy cream until soft peaks form. Gradually add the powdered sugar while continuing to whip. Keep going until you achieve stiff peaks. This fluffy frosting is what makes your cupcakes truly special!
Step 9: Frost and Decorate
Once the cupcakes are completely cool, it’s time to frost them with your whipped cream. Use a spatula or a piping bag for a fun design. Then, sprinkle on the black and white sprinkles and top with those adorable skull-shaped candy decorations. Voilà! Your Spooky Halloween Skull Cupcakes are ready to impress!
Tips for Success
- Always preheat your oven for even baking.
- Use room temperature ingredients for better mixing.
- Don’t overmix the batter; a few lumps are okay!
- Let cupcakes cool completely before frosting to avoid melting.
- Experiment with food coloring in the whipped cream for a festive twist.
Equipment Needed
- Cupcake pan: A standard 12-cup pan works perfectly.
- Cupcake liners: Use festive liners for a fun touch.
- Mixing bowls: A large bowl for dry ingredients and a medium bowl for wet.
- Whisk: A hand whisk or electric mixer for whipping cream.
- Spatula: For frosting and spreading the whipped cream.
Variations
- Gluten-Free: Substitute all-purpose flour with a gluten-free blend for a delicious gluten-free option.
- Vegan: Use flax eggs instead of regular eggs, almond milk in place of buttermilk, and coconut cream for the frosting.
- Flavor Twist: Add a teaspoon of peppermint extract for a refreshing minty flavor or orange zest for a citrusy kick.
- Chocolate Chips: Fold in some chocolate chips into the batter for an extra chocolatey treat.
- Spooky Colors: Use food coloring to tint the whipped cream in Halloween colors like green or purple for a fun twist!
Serving Suggestions
- Pair these cupcakes with a glass of cold milk or a warm cup of cocoa for a cozy treat.
- Serve on a spooky-themed platter to enhance the Halloween vibe.
- Consider adding a side of fresh fruit for a refreshing contrast.
- For a fun twist, create a cupcake tower for your Halloween party!
FAQs about Spooky Halloween Skull Cupcake with Cream and Sprinkles
Can I make these cupcakes ahead of time?
Absolutely! You can bake the cupcakes a day in advance. Just store them in an airtight container at room temperature. Frost them on the day you plan to serve for the best results.
What can I use instead of buttermilk?
If you don’t have buttermilk on hand, you can make a quick substitute. Just mix one cup of milk with a tablespoon of vinegar or lemon juice. Let it sit for about 5 minutes, and you’re good to go!
How do I store leftover cupcakes?
Store any leftover Spooky Halloween Skull Cupcakes in an airtight container at room temperature for up to three days. If you want to keep them longer, consider refrigerating them, but let them come to room temperature before serving.
Can I use a different frosting?
Of course! While whipped cream is light and fluffy, you can use buttercream or cream cheese frosting if you prefer a richer taste. Just make sure it’s thick enough to hold the decorations!
How can I make these cupcakes more festive?
Get creative! You can add food coloring to the whipped cream for a spooky hue or use different Halloween-themed sprinkles. The more colorful, the better for Halloween!
Final Thoughts
Creating these Spooky Halloween Skull Cupcakes with Cream and Sprinkles is more than just baking; it’s about making memories. The joy on my family’s faces as they bite into these delicious treats is priceless. Each cupcake is a little piece of Halloween magic, bringing laughter and delight to our celebrations. Whether you’re hosting a party or just enjoying a cozy night in, these cupcakes are sure to add a festive touch. So, roll up your sleeves, gather your loved ones, and let’s make some spooky memories together in the kitchen!
Print
Spooky Halloween Skull Cupcake with Cream and Sprinkles Awaits!
- Total Time: 40 minutes
- Yield: 12 cupcakes 1x
- Diet: Vegetarian
Description
Delicious and festive cupcakes decorated to resemble spooky skulls, perfect for Halloween celebrations.
Ingredients
- 1 ½ cups all-purpose flour
- 1 cup granulated sugar
- ½ cup unsweetened cocoa powder
- 1 tsp baking powder
- ½ tsp baking soda
- ½ tsp salt
- 2 large eggs
- ½ cup vegetable oil
- 1 tsp vanilla extract
- 1 cup buttermilk
- 1 cup heavy cream
- 2 cups powdered sugar
- Black and white sprinkles
- Skull-shaped candy decorations
Instructions
- Preheat the oven to 350°F (175°C) and line a cupcake pan with cupcake liners.
- In a large bowl, mix together the flour, sugar, cocoa powder, baking powder, baking soda, and salt.
- In another bowl, whisk together the eggs, vegetable oil, vanilla extract, and buttermilk.
- Combine the wet ingredients with the dry ingredients and mix until just combined.
- Fill the cupcake liners about 2/3 full with the batter.
- Bake for 18-20 minutes or until a toothpick inserted comes out clean.
- Let the cupcakes cool completely.
- In a separate bowl, whip the heavy cream until soft peaks form, then gradually add the powdered sugar and continue whipping until stiff peaks form.
- Frost the cooled cupcakes with the whipped cream and decorate with black and white sprinkles and skull-shaped candy.
Notes
- Ensure the cupcakes are completely cool before frosting to prevent melting.
- Feel free to use food coloring to tint the whipped cream for a more festive look.
- Store any leftover cupcakes in an airtight container at room temperature for up to 3 days.
- Prep Time: 20 minutes
- Cook Time: 20 minutes
- Category: Dessert
- Method: Baking
- Cuisine: American
Nutrition
- Serving Size: 1 cupcake
- Calories: 250
- Sugar: 18g
- Sodium: 150mg
- Fat: 12g
- Saturated Fat: 6g
- Unsaturated Fat: 4g
- Trans Fat: 0g
- Carbohydrates: 32g
- Fiber: 1g
- Protein: 3g
- Cholesterol: 40mg