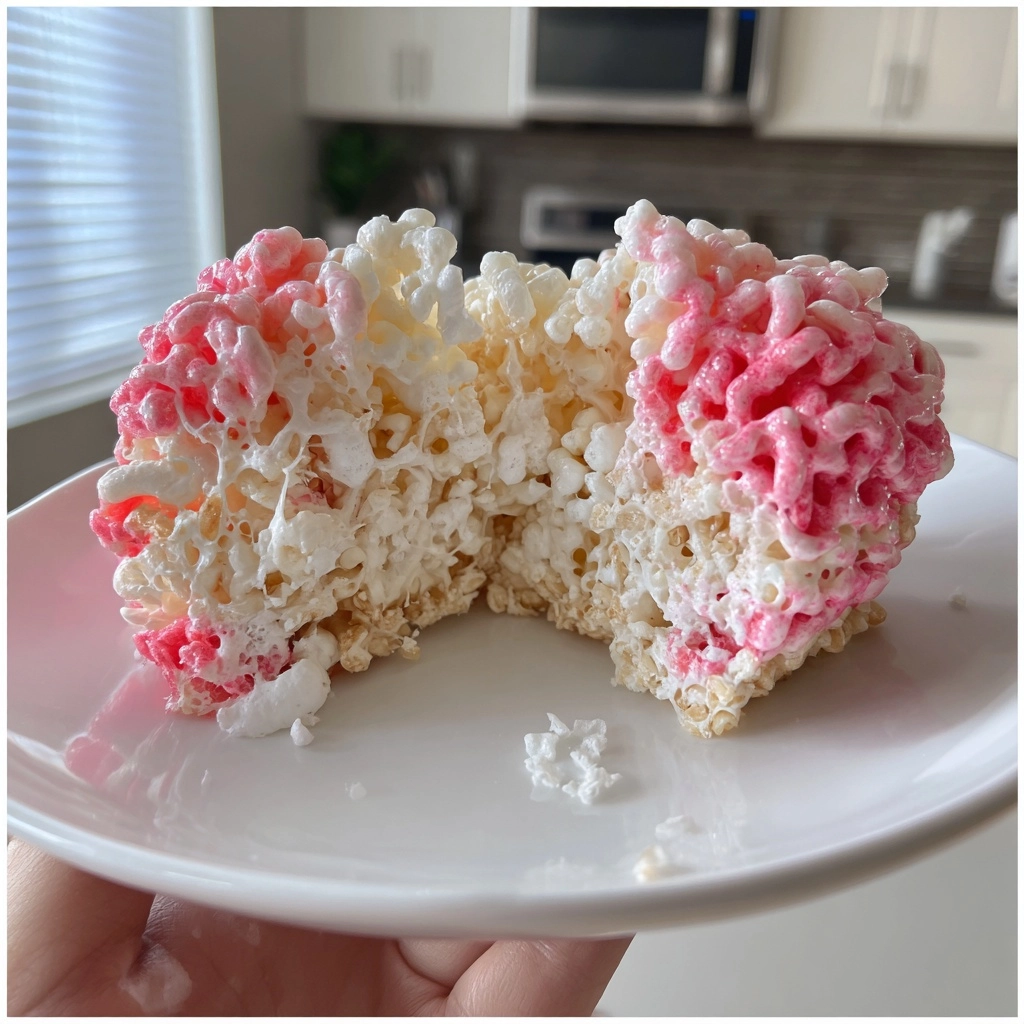
Introduction to Marshmallow Rice Krispies (Bubbles) Halloween Brains
As the leaves turn and the air gets crisp, I find myself dreaming up fun treats for Halloween. One of my all-time favorites is Marshmallow Rice Krispies (Bubbles) Halloween Brains. These spooky delights are not just a hit with the kids; they bring out the inner child in all of us!
Whether you’re a busy mom juggling work and family or a professional looking to impress at a Halloween gathering, this recipe is a quick solution. With just a few ingredients and minimal time, you can create a treat that’s both fun and delicious!
Why You’ll Love This Marshmallow Rice Krispies (Bubbles) Halloween Brains
These Marshmallow Rice Krispies (Bubbles) Halloween Brains are a breeze to whip up, making them perfect for busy days. In just 25 minutes, you can create a spooky treat that’s sure to impress. The combination of gooey marshmallows and crispy cereal is simply irresistible. Plus, they’re a fun way to get the kids involved in the kitchen, turning a simple recipe into a memorable family activity!
Ingredients for Marshmallow Rice Krispies (Bubbles) Halloween Brains
Gathering the right ingredients is half the fun! Here’s what you’ll need to create these spooky Marshmallow Rice Krispies (Bubbles) Halloween Brains:
- Butter: This is the base for your gooey mixture. It adds richness and helps everything stick together.
- Marshmallows: The star of the show! They melt down to create that sweet, sticky goodness we all love.
- Rice Krispies cereal: These crispy little gems provide the perfect crunch and texture, balancing the softness of the marshmallows.
- Red food coloring: A few drops will give your brains that eerie, blood-like hue. Feel free to adjust the amount for a more intense color!
- Chocolate melts: These are optional but highly recommended for decorating. They add a fun touch and can be used to create details on your brain treats.
For exact measurements, check the bottom of the article where you can find everything listed for easy printing. Happy cooking!
How to Make Marshmallow Rice Krispies (Bubbles) Halloween Brains
Now that you have your ingredients ready, let’s dive into the fun part—making these spooky treats! Follow these simple steps, and you’ll have a batch of Marshmallow Rice Krispies (Bubbles) Halloween Brains in no time.
Step 1: Melt the Butter
Start by grabbing a large saucepan. Place it on low heat and add the butter. As it melts, the aroma will fill your kitchen, making it feel cozy and inviting. Stir occasionally to ensure it doesn’t burn. This step is crucial because melted butter is the foundation of your gooey mixture!
Step 2: Add the Marshmallows
Once the butter is fully melted, it’s time to add the marshmallows. Pour them in and stir continuously until they’re completely melted and smooth. This is where the magic happens! The mixture should look like a fluffy cloud, and the sweetness will start to waft through the air.
Step 3: Color the Mixture
Now, let’s add a spooky twist! Remove the saucepan from heat and add a few drops of red food coloring to the melted marshmallow mixture. Stir well until the color is evenly distributed. You can adjust the amount of coloring to achieve your desired shade. The more red, the more eerie your brains will look!
Step 4: Mix in the Rice Krispies
Next, it’s time to add the Rice Krispies cereal. Pour them into the marshmallow mixture and gently fold them in. Make sure every piece is coated with that sticky goodness. This step is like a dance—be gentle but thorough, so you don’t crush the cereal!
Step 5: Mold the Brains
Now comes the fun part! Grease your brain-shaped mold with a little butter or cooking spray. This will help your treats pop out easily later. Press the Rice Krispies mixture firmly into the mold, making sure to fill every nook and cranny. The more compact, the better!
Step 6: Cool and Remove
Let your molded brains cool completely. This usually takes about 30 minutes. Once they’re set, gently remove them from the mold. If they stick a bit, a gentle twist should do the trick. You’ll be left with perfectly shaped brain treats that are ready for decoration!
Step 7: Decorate with Chocolate
Finally, it’s time to get creative! Melt some chocolate melts in the microwave or on the stovetop. Use a piping bag or a spoon to drizzle the melted chocolate over your brains. You can create fun details like veins or even spooky eyes. This is where you can let your imagination run wild!
Tips for Success
- Make sure to grease your mold well to avoid sticking.
- For a smoother chocolate drizzle, melt it slowly and stir until fully melted.
- Use fresh marshmallows for the best texture and flavor.
- Involve the kids in decorating; it’s a fun way to bond!
- Store leftovers in an airtight container to keep them fresh and chewy.
Equipment Needed
- Large saucepan: A non-stick option works best for easy cleanup.
- Wooden spoon: Perfect for stirring; a silicone spatula is a great alternative.
- Brain-shaped mold: If you don’t have one, use a muffin tin for fun shapes.
- Microwave-safe bowl: Ideal for melting chocolate; a double boiler can also be used.
Variations
- Chocolate Rice Krispies: Swap out regular Rice Krispies for chocolate-flavored ones for a richer taste.
- Nut Butter Addition: Stir in a few tablespoons of peanut or almond butter for a nutty twist and added creaminess.
- Vegan Option: Use vegan butter and marshmallows to make these treats suitable for a plant-based diet.
- Colorful Brains: Experiment with different food coloring shades, like green or purple, for a unique Halloween look.
- Sprinkle Toppings: Add festive sprinkles or edible glitter on top for an extra fun and festive touch!
Serving Suggestions
- Pair these spooky treats with a glass of cold apple cider for a festive touch.
- Serve on a Halloween-themed platter to enhance the spooky vibe.
- Consider adding gummy worms or candy eyeballs for extra fun on the side.
- Wrap them in clear cellophane and tie with a ribbon for a cute party favor.
FAQs about Marshmallow Rice Krispies (Bubbles) Halloween Brains
Can I make these Marshmallow Rice Krispies (Bubbles) Halloween Brains in advance?
Absolutely! You can prepare these spooky treats a day in advance. Just store them in an airtight container to keep them fresh. This way, you can enjoy more time with your family and friends on Halloween!
What can I use instead of a brain-shaped mold?
If you don’t have a brain-shaped mold, don’t worry! A muffin tin or even a cookie sheet can work. Just shape the mixture into small mounds for a fun twist!
How do I store leftover Marshmallow Rice Krispies (Bubbles) Halloween Brains?
To keep them fresh, store your leftover treats in an airtight container at room temperature. They should stay chewy and delicious for several days!
Can I use different colors for the food coloring?
Of course! While red gives that classic spooky look, feel free to experiment with other colors like green or purple. It’s a fun way to customize your Halloween treats!
Are these treats suitable for kids with allergies?
These Marshmallow Rice Krispies (Bubbles) Halloween Brains contain butter and marshmallows, which may not be suitable for all kids. Always check labels for allergens and consider using allergy-friendly substitutes if needed.
Final Thoughts
Creating these Marshmallow Rice Krispies (Bubbles) Halloween Brains is more than just making a treat; it’s about crafting memories. The laughter shared in the kitchen, the excitement of decorating, and the joy of seeing those delighted faces make it all worthwhile.
These spooky snacks are perfect for any Halloween gathering, bringing a touch of fun and creativity to the table. So, gather your loved ones, roll up your sleeves, and dive into this delightful recipe. I promise, the smiles and giggles will be the best part of your Halloween celebration!
Print
Marshmallow Rice Krispies (Bubbles) Halloween Brains Recipe!
- Total Time: 25 minutes
- Yield: 12 servings 1x
- Diet: Vegetarian
Description
A fun and spooky treat perfect for Halloween, these Marshmallow Rice Krispies (Bubbles) shaped like brains are sure to delight kids and adults alike.
Ingredients
- 3 tablespoons butter
- 1 package (10 oz) marshmallows
- 6 cups Rice Krispies cereal
- Red food coloring
- Chocolate melts (for decoration)
Instructions
- In a large saucepan, melt the butter over low heat.
- Add the marshmallows and stir until completely melted.
- Remove from heat and add a few drops of red food coloring to the melted mixture.
- Stir in the Rice Krispies cereal until well coated.
- Grease a brain-shaped mold and press the mixture into the mold.
- Let it cool completely before removing from the mold.
- Decorate with melted chocolate to create details on the brains.
Notes
- For a more intense color, add more red food coloring.
- Store in an airtight container to keep them fresh.
- These can be made a day in advance for convenience.
- Prep Time: 15 minutes
- Cook Time: 10 minutes
- Category: Dessert
- Method: Stovetop
- Cuisine: American
Nutrition
- Serving Size: 1 brain
- Calories: 150
- Sugar: 10g
- Sodium: 50mg
- Fat: 5g
- Saturated Fat: 3g
- Unsaturated Fat: 2g
- Trans Fat: 0g
- Carbohydrates: 25g
- Fiber: 0g
- Protein: 1g
- Cholesterol: 15mg

